hassock re-upholstery, part 2: making the cushion
After demolition of the original hassock upholstery, I was ready to begin designing and sewing the brand new cushion.
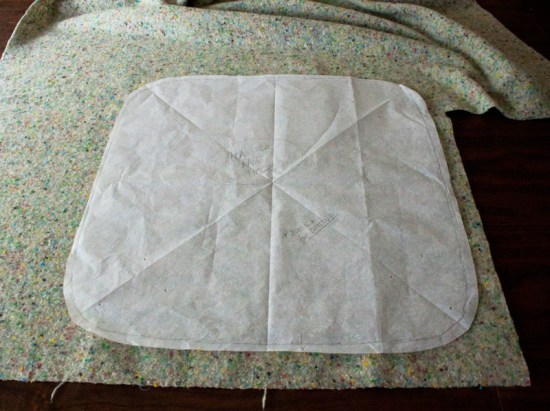
During demolition, I traced the outline of the current cushion to get a good start on the pattern. I cut my tracing out loosely, then folded a few times (think paper snowflake) as you can see by the creases in the tissue. When I cut the shape with everything folded, I could be certain that it was symmetric in all directions. Rounded corners are especially easy for me to skew one way or the other when I do it by sight, so folding made that much easier.
Here’s a closeup of the fabric I used! It’s heavy duty wool with a woven side and a softer, fuzzy side. Even though the fuzzy side is obviously the right side, the wrong side is also interesting.
I cut out my rounded square top, and two long rectangles to serve as the sides of the cushion. This could have been one super long rectangle, of course, but that wouldn’t fit with my fabric allowance. Plus, this makes it symmetric.
More cushion construction after the jump… including my classy little “underflaps” invention!
Even though my wool is heavy-weight and woven, I wasn’t sure it would have long-lasting strength if it were stretched from time to time. I wanted a thick woven cotton for backing, so I went shopping in “the basement fabric store”. That’s what my mom and I call the giant bins of fabric in the basement. The selection is questionable, and the stock isn’t very well organized… but you can’t beat the location OR the prices!
I managed to find exactly what I needed! I was pretty excited because that’s a rarity for the basement fabric store, especially when it’s something boring and useful like this heavy cotton. Awesome! I cut out strips and basted all the matching pieces together with right sides out, of course.
After basting, I sewed together the two rectangle pieces to make one very long rectangle piece. You can see the seam in the next picture… these sorts of things are hard to put into words.
Next, it was time to sew my long rectangle piece to the rounded square top. These sorts of shapes are always difficult for me, because it’s hard to keep everything from getting wrinkles in the seams and it’s also a challenge to keep all the corners consistent. My main trick here was saving that one side for last! The turned up edges were not sewn down on my first time around. Does that make sense? I sewed 4 corners and 3 sides (everything pinned in the above photo), but I saved that one side for last so I had a little bit of breathing room with my fabric.
I also pinned very precisely at the corners, while trying to let the fabric go where it wanted to go.
Once everything else was sewn to the rounded square top, I knew exactly how much more fabric I needed from the long rectangle piece. I sewed the ends together, then stitched this last edge to the rounded square top. Saving this side until last helped make sure I didn’t have any bunching or wrinkles.
Flipped it right-side-out, and… yep! Starting to look like a real cushion.
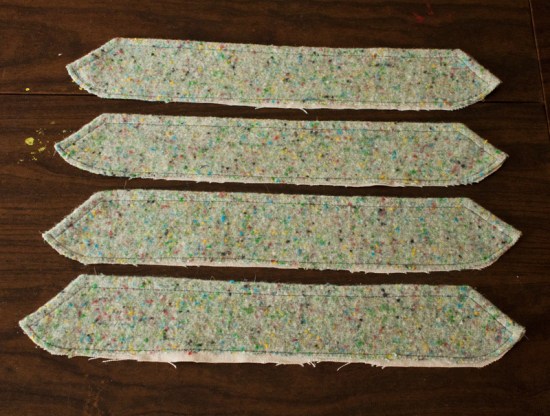
I had noticed that the original hassock casing was held snug by a cotton “skirt” of sorts with twine and a casing. It really only provided something stable for the staples to hold onto. This method seemed like it wouldn’t give me results that I wanted. I needed a good finished edge along the bottom of my hassock, and I wanted plenty of strong stuff so the stables wouldn’t rip out. While I was at it, I wanted this hassock to look professional even on the underside. That’s how I came up with these little underflaps.
Rounded, of course, to correspond to the rounded square of the cushion – and then angled sides so that, when turned toward the wood on the bottom of the cushion, they’d match up perfectly.
I cut 4 of the same shape out of my wool, and then I cut a counterpart for each from the thick cotton lining fabric.
I sewed all but the curved side, as you see here, and clipped my corners.
Then I turned them right-side-out, topstitched along the seam line, and basted the bottom curved edge shut.
Then, I sewed each curved edge to an edge of the cushion. As you can barely see in the left side of the above photo, my underflaps didn’t come out perfectly sized… they were each a bit too long so they overlapped. They wouldn’t provide the super sleek finish I had dreamed of, but they were still going to look just fine.
At this point I did a quick fit test with my original plywood board, and it fit perfectly. Super!
For an even better fit test, I shoved a giant foam block inside to get an idea of the cushion’s performance. The foam block makes the cushion look less squishy that I’m aiming for, but otherwise the cushion looks like a success.
And what’s that? Is that piping on the cushion?
No! It’s fake piping! And it’s great!
It is super easy and it looks really great with thick fabric like this one. Just one more post in the series and then I’ll show you my sneaky trick!
This post is the third part of my mini Hassock Reupholstery series. Click that link to see the rest!


Wow, no one would ever guess that this is your first attempt at upholstery.
It’s looking great. Look forward to the next instalment. Thank You
Thanks so much Debbie! I can’t wait to show you the finished hassock!