I’ve decided that I am addicted to possibilities. I’m a possibilities addict, if you will.
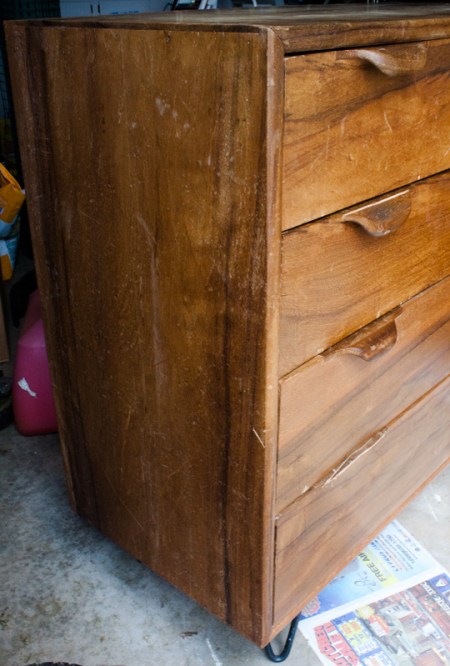
And that is why I couldn’t leave this gorgeous, if unloved, mid-century wooden dresser at Goodwill on Sunday*.
The entire purpose of my drive to Goodwill, by the way, was to drop off a donation… an old dresser of mine. Because I had a new one and didn’t need it anymore.
Really.

First of all, and most importantly, this dresser is gorgeous. It is my favorite shade of wood: not too dark but not light. It’s a great size, because it’s not a giant piece of furniture and would be able to find a place in just about any room. It’s wonderfully square. It’s heavy and real wood. The handles are awesome. And it has hairpin legs.
When I spotted it, I gave it a good once-over. First: the handles on the bottom drawer had broken off. Bad news. I began to consider how it would look without a bottom drawer, even: could that serve as a little shelf instead? But the handles were inside! And I have strong faith in the power of wood glue combined with clever clamping.

Next, the general condition of the wood. Overall, I believe that the wood on this dresser is in fine shape. There are some finish irregularities in areas – and this side is quite splotchy – but I think I’ll be able to refresh it without even doing a heavy sanding. And with the color as it is, I am not restaining. I love its current shade too much to mess with it.

The top of the dresser is the only part that needs heavier work. There are some small water rings/spots (white, thank goodness, not black!), and the whole surface is just lacking in color, most likely from too much sun in its fairly long lifetime. There’s a chance it will need some sanding and some rejuvenation. But I’m not afraid of it.
So it’s true, I’ve given myself another project. But I couldn’t leave it at the store because of the possibility of the rejuvenated piece. I had so much hope for this broken, unloved piece of furniture. I could see what it could be. And that possibility was far too great for me to say no to. In fact, I believe that I love this dresser more because it isn’t perfect. Because it needs some work. Because it has so much potential… so much possibility. If I had found the same thing in mint condition, I may have still bought it… but I probably wouldn’t be so elated.
So into the trunk it went, where the seats were still down from the fact that I had dropped off a dresser less than half an hour ago. A dresser trade. And infinite possibility.
Are you like me? Do you buy things solely on what they could be, rather than what they are?
*yes, Goodwill is open on Sundays! Who knew!


