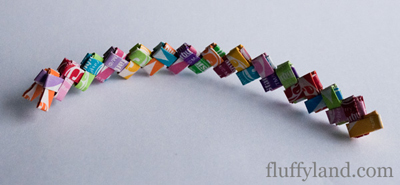
Big news! The Starburst Wrapper Bracelet Tutorial is now available as an Amazon e-book!
It’s only $2.99 and with the e-book version, you can take this handy step-by-step guide wherever you’re going to be folding! For an excellent crafty gift, give the e-book along with a pack of Starburst. The purchased book can be read on the iPad, Kindle, e-reader, or your computer screen so it’s portable and versatile.
Thanks for your support of Fluffyland Craft & Sewing Blog, and enjoy crafting!
Have you been wondering how to make the amazing bracelets from Starburst wrappers? A simple folding method, plus some finishing tips, will help you make your very own Starburst bracelet. It looks like a lot of steps, but after you’ve made a few links you’ll have the folding method memorized. The average bracelet takes 30-36 Starburst wrappers, so save up! Ask friends to unwrap carefully and “donate”, and to avoid candy binges and sugar highs, unwrap all your Starbursts and save them in a ziploc bag for later. You can save money by buying Starbursts in bulk from Amazon.
If you’re clever, you can make this bracelet from any rectangular wrapper: dum dum wrappers, tootsie roll wrappers, most gum wrappers, now and laters… be creative, there are lots of options!
Keep in mind that when you have finished, you need the bracelet to be big enough to slide on and off your wrist without too much trouble. Because of the folding method, the bracelet will stretch slightly, so this shouldn’t be much of a problem.., but be careful. This is the only tutorial that contains the ending method that blends in with the rest of the bracelet; it’s very tricky but entirely feasible.
Click on any of the photos for a larger view.
Step 1
Take your first wrapper… and flip it over.
I know, it’s tricky.
Step 2
Fold (hot dog) one side in to the halfway point.
Step 3
Fold (hot dog) the other side to the halfway point.
Step 4
Next, fold (hot dog) the whole thing in half so the raw edges you just folded are on the inside crease.
Step 5
Fold (hot dog) in half again.
Step 6
Fold (hamburger) in half.
Step 7
Fold (hamburger) one side to the halfway point.
Step 8
Fold (hamburger) the other side to the halfway point. Steps 1-8 give 1 completed link.
Repeat steps 1-8 with the next wrapper.
Step 9
Insert points 1 and 2 into slots A and B, so it looks like this:
Step 11
Continue making links (steps 1-8) and adding them on (steps 9 & 10)…
Step 12
… until you begin to build up a chain.
Step 13
Once you have reached the desired length… this is where it gets tricky.
Step 14
Make one more link the same way as the others (steps 1-8), but then unfold the last two folds. Insert these raw edges into the same spots in the “V”.
Step 15
Pull the two ends of the bracelet close together, and hold the edges of your long “V” over both edges of the end of the other side.
Step 16
Insert the raw edges into the first wrapper. You’re doing the same thing we’ve been doing, but backwards. That’s the easiest way to think about it. It’s hard to photograph and explain, but if you’re making it look like all the other links, you’re doing it right.
Step 17
Pull ends through until you reach the original folded point, and tuck the raw edges into the previous wrapper, so it looks just like the other wrappers in the chain.
tip! At this point, I find it helpful to use a paperclip or similar item to push the wrappers through. This is the trickiest part, and will require a bit of fiddling.

And you’re done! Congratulations!
I’d love to see pictures or hear about your bracelet-making adventures! Leave a comment below or send me a picture of your new bracelet!


I don’t get step 9…