Category: Experiments

the making of a fluffyland custom plush

the making of a fluffyland custom plush

Today, I thought it might be fun to give you a peek into my process for making custom plush. I always love seeing the thought process of other makers, because a finished product only tells you so much. So here’s a bit of behind the scenes on the making of a Fluffyland custom plush… Marie’s plush alpaca, to be precise.

google image search for alpacas

Once I’ve figured out what I want to make, I usually start – as most people probably start any project these days – with a Google search. It’s the craziest thing, but whenever I start to draw something, I immediately forget all the key details. A quick peek at some images keeps me in check.

And, in the case of these alpacas (or the Big Chicken), looking at all the images makes me even more enthusiastic about the project. Alpacas are just so happy looking (in a sometimes angry sort of way).

google image search for alpaca plush

Sometimes I’ll look for pictures of other plush to see if or how it’s been done before. I don’t always do this because I usually have an image in my head that I want to hold onto, and looking at other people’s plush can cause me to stray from my own unique ideas. But in this case, it was a worthwhile search because the alpacas I found weren’t at all what I was looking to make, and that helped affirm that my idea was new and necessary.

One of my best strategies is to look at cartoon or clip-art versions of what I’m trying to make. A challenge in making custom plush is deciding which features are key features and which features can be left out. A good example of this is my submarine whale. When I looked at pictures of submarines, they were way too detailed for my needs. Looking at cartoon submarines helped me identify the key features of “what makes a submarine” – in that case, it was portholes and a periscope. For an alpaca, the key features were ears, a big forehead, eyebrows, and a tail.

plush alpaca initial sketch

Once I have a clear image in my head, I start to sketch it on paper. I can cut any shape, but my drawing skills are pretty undeveloped. These sketches are meant to remind me what I see in my head, and they work just fine for that purpose.

plush alpaca initial sketch

Then I start to draw shapes that will resemble the pattern that I’ll make. They often look pretty silly.

plush alpaca sketch and prototype

Here, once I had decided on a body shape, I cut out a prototype from scrap fleece. Stitching this prototype and turning it inside out showed me that I needed to provide more seam allowance, especially at the neck – it’s an alpaca, not a giraffe! (or an ostrich, which I think it resembles here.)

plush alpaca sketch and pattern

With the arrows indicating areas of need, I sketch out a final pattern.

plush alpaca pattern

This is the pattern I sewed from, and it includes all the key pattern pieces except for the belly, which I just made up when it got to that point. For the 3D features, it’s usually easier to make them up from fabric rather than paper.

I’ve been trying harder to take notes and save all the final pattern pieces from my plush and other projects. Sometimes in the flurry of “making things up”, I forget to document my changes, and by the time I’m finished, I can’t recreate what I’ve made. So a good notebook and pattern binder are key to being able to learn from past patternmaking attempts. For example, here I remember that using wool helped the legs stay stiff enough for the alpaca to stand on its own… and that’s awesome!

wool plush alpaca

And we all know how the story ends. Pieces together, eyes installed, and all stuffed and stitched up, this alpaca was ready to journey across the Atlantic. Hurray!

glass blowing party

sam shaping a glass bowl - learning glass blowing

A few Fridays ago, I cashed in a sweet Groupon: a glass blowing party at J & C Glass Studio.

I’ve been slowly working my way up in the world of hot glass. First, of course, are the fusing experiments I’ve been doing in my kiln, which usually don’t go above 1600°F. This allows for a “full fuse”, meaning the glass layers meld into each other until they appear as one flat piece of glass. Next came a class on lampworking glass beads with a torch (also a groupon!): the torch can emit a flame of nearly 5000°F! But it is a small torch.

But the glassblowing furnace? It holds a pool of molten glass at around 2000°F. Two thousand degrees! Held constant throughout the entire furnace! That’s a lot of energy.

To make this bowl, we first dipped the end of the rod into the furnace of molten glass. All of the glass prepared for us in the furnace was clear glass – but in its molten state it was golden.

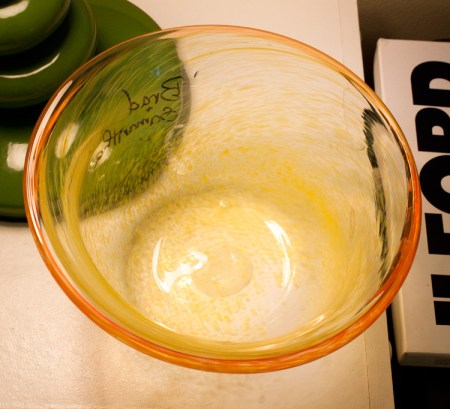
After collecting this blob of molten glass on the end of the rod/tube, we dipped it in yellow frit. Frit is tiny pieces of glass, ground almost to a powder, all of a uniform color. It’s used to easily provide precise color in hot glass projects – but for us, it’s what gives this bowl its swirly, spotty coloring because each little fleck melts smoothly into the molten surface.

Molten and fritted, it was time to blow the blob into a bulb. Blob to bulb to bowl! There’s a summary for you.

brad shaping a glass bowl - learning glass blowing

These pictures are actually in the wrong order – sorry Brad, I wanted to be at the top of the post! But the picture with Brad shows the bulb – it’s a blob of glass with a big air pocket inside. Once it’s big enough, the blowing part is done, and they actually stick it onto a second rod to start shaping the lip of the bowl.

That’s what I did. When I started at the bench seat, I had a rod (Rod #2) with a bulb – and the bulb had a tiny hole on the end from where it had been removed from Rod #1. The instructor made sure the rod was kept spinning constantly while I pulled the lip down with those giant tongs. Somewhere in there we dipped the rim in orange frit so that the bowl would have an orange rim.

What amazed me (and this shouldn’t have been a surprise, I know!), was how hot the glass was. My arm was over the bowl as I used the tongs, and I thought I was being burned just from the heat emanating from the molten bowl. Brad felt the same way – he thought the hair on his arms was about to catch fire! When I got home, my arm was red and splotchy, like I had been sunburned. But it was fine by morning. I wasn’t worried, exactly, but it was a little bit painful! I gained a new respect for the artists who work at that studio every day.

Once the bowl was appropriately sized and shaped, we removed it from the rod (accomplished using precise drips of water and a firm tap!) and it went into the kiln to be annealed – cooled slowly to prevent stress fracture. The whole process, from blob to bulb to bowl, took less than 15 minutes. With molten glass, you have to work fast!

Last week, we got to go pick it up! We hadn’t seen it in a not-molten state, of course, so we were very excited.

handmade yellow & orange glass bowl  - matches my curtains

As you can see, it matches my curtains quite nicely.

handmade yellow & orange glass bowl

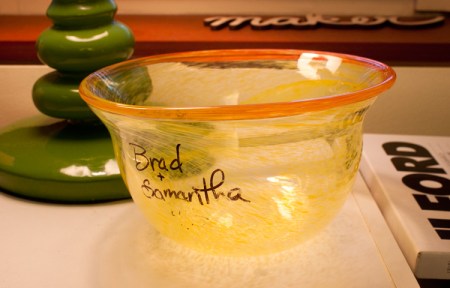
And yes, it’s a little bit lopsided. But not very! Also – it’s pretty big! The diameter at the widest point of the lip is nearly 7 inches. So it can fit lots of snacks.

glass bowl made by brad & samantha

Our names can be easily removed, but I haven’t wanted to do so yet. I rather like them there, because it proves, hey, we made this.

It was really fun to take time out from a busy week and go Make Something New. I love that feeling. It was tricky – glassblowing is certainly an advanced art, and we had lots of help – but it was fun. I can’t wait to do more hot glass projects in my kiln this summer. And I can’t wait to eat lots of snacks out of this beautiful bowl.


prehistoric plush: dunkleosteus

Theodore Roosevelt summed it up best with this quote:
“whenever you are asked if you can do a job, tell ’em, ‘certainly i can!’ then get busy and find out how to do it.”

a dunkleosteus rendering (source: wikipedia)

Dunkleosteus: a big, old fish.

I think, barring anything incredibly complex, it’s a great philosophy. So when one of my photography friends said, “hey sam, can you make a plush dunkleosteus?” I said, “sure!”

(well, first i said “what is that?!” and he told me it was a giant dinosaur fish thing.)

At first, I was worried. Those teeth, all the layers of bone, all the details and hard edges… what if I couldn’t do it? But it was one of those moments where, as soon as I stopped thinking about it, I could see it perfectly in my head. It’s a plush, right? I can do plush. At that point I gave myself a pep talk, rushed to Joann’s, snagged a ton of gray fleece, and got to work.

This was one of the most complex plush I’ve ever made: he’s got side flippers, a top fin, little tail fins. With all the “bone”/exoskeleton layers, the back of his body is three layers of fleece. And then there are those teeth! Man, those were tricky. Symmetry is always a challenge.

He took longer than expected, because there was a lot of pattern drafting to be done. But I think he was worth the wait. Wanna see?

dunkleosteus (prehistoric fish) handmade plush

dunkleosteus (prehistoric fish) handmade plush, goofy smile and all

dunkleosteus (prehistoric fish) handmade plush

I just love his goofy smile, and the fleece, as always, is just so soft. I also finally broke into the ultimate safety eye stash that I’ve been hoarding for a few years now – it sure is handy to have some of every safety eye lying around!

I just love doing custom plush. It’s always a scary challenge, but they usually come out alright, and that just feels so good! Do you like it?