Category: Tutorials

Starburst Wrapper Bracelet Tutorial

Big news! The Starburst Wrapper Bracelet Tutorial is now available as an Amazon e-book!

It’s only $1.99 and with the Kindle version, you can take this handy step-by-step guide wherever you’re going to be folding! Giving the e-book along with a pack of Starburst wrappers would be an excellent gift.

Thanks for your continued support of Fluffyland Craft & Sewing Blog, and enjoy crafting!


starburst bracelet!

Have you been wondering how to make the amazing bracelets from Starburst wrappers? A simple folding method, plus some finishing tips, will help you make your very own Starburst bracelet. It looks like a lot of steps, but after you’ve made a few links you’ll have the folding method memorized. The average bracelet takes 30-36 Starburst wrappers, so save up! Ask friends to unwrap carefully and “donate”, and to avoid candy binges and sugar highs, unwrap all your Starbursts and save them in a ziploc bag for later. You can save money by buying Starbursts in bulk from Amazon.

If you’re clever, you can make this bracelet from any rectangular wrapper: dum dum wrappers, tootsie roll wrappers, most gum wrappers, now and laters… be creative, there are lots of options!

Keep in mind that when you have finished, you need the bracelet to be big enough to slide on and off your wrist without too much trouble. Because of the folding method, the bracelet will stretch slightly, so this shouldn’t be much of a problem.., but be careful. This is the only tutorial that contains the ending method that blends in with the rest of the bracelet; it’s very tricky but entirely feasible.

Click on any of the photos for a larger view.

Step 1
starburst wrapper bracelet tutorial
Take your first wrapper… and flip it over.
I know, it’s tricky.

Step 2
starburst wrapper bracelet tutorial
Fold (hot dog) one side in to the halfway point.

Step 3
starburst wrapper bracelet tutorial
Fold (hot dog) the other side to the halfway point.

Step 4
starburst wrapper bracelet tutorial
Next, fold (hot dog) the whole thing in half so the raw edges you just folded are on the inside crease.

Step 5
starburst wrapper bracelet tutorial
Fold (hot dog) in half again.

Step 6
starburst wrapper bracelet tutorial
Fold (hamburger) in half.

Step 7
starburst wrapper bracelet tutorial
Fold (hamburger) one side to the halfway point.

Step 8
starburst wrapper bracelet tutorial
Fold (hamburger) the other side to the halfway point. Steps 1-8 give 1 completed link.

Repeat steps 1-8 with the next wrapper.

Step 9
starburst wrapper bracelet tutorial
Insert points 1 and 2 into slots A and B, so it looks like this:
starburst wrapper bracelet tutorial

Step 10
starburst wrapper bracelet tutorial   starburst wrapper bracelet tutorial
And pull it through.

Step 11
starburst wrapper bracelet tutorial
Continue making links (steps 1-8) and adding them on (steps 9 & 10)…

Step 12
starburst wrapper bracelet tutorial
… until you begin to build up a chain.

Step 13
starburst wrapper bracelet tutorial
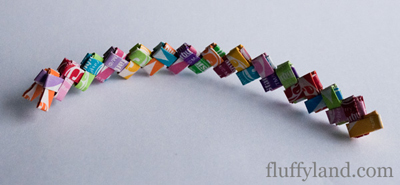
Once you have reached the desired length… this is where it gets tricky.

Step 14
starburst wrapper bracelet tutorial
Make one more link the same way as the others (steps 1-8), but then unfold the last two folds. Insert these raw edges into the same spots in the “V”.

Step 15
starburst wrapper bracelet tutorial
Pull the two ends of the bracelet close together, and hold the edges of your long “V” over both edges of the end of the other side.

Step 16
starburst wrapper bracelet tutorial
Insert the raw edges into the first wrapper. You’re doing the same thing we’ve been doing, but backwards. That’s the easiest way to think about it. It’s hard to photograph and explain, but if you’re making it look like all the other links, you’re doing it right.

Step 17
starburst wrapper bracelet tutorial
Pull ends through until you reach the original folded point, and tuck the raw edges into the previous wrapper, so it looks just like the other wrappers in the chain.
tip!   At this point, I find it helpful to use a paperclip or similar item to push the wrappers through. This is the trickiest part, and will require a bit of fiddling.

starburst bracelet!

And you’re done! Congratulations!

I’d love to see pictures or hear about your bracelet-making adventures! Post a comment and/or pictures!

Order Starbursts in bulk from Amazon:


a guide to sewing in your dorm room

For the last three years, my sewing machine has held center stage on my dorm room desk. I’ve been pressed for space, and I’ve had to choose my projects accordingly, but I haven’t stopped sewing.

As a seamstress in college, I need my sewing to keep me sane. It’s a pleasant break from the homework and exams, and it keeps my brain moving. I know I’m not alone in this, so I decided to make this little guide so that nobody has to think, my space is just too small to sew in.

sewing machine takes center stage on my desk

The Desk
My sewing machine is always perched at the back of my desk. If I were to stow it away in a closet or under my bed, I would only rarely make the effort to get it out. This is what works for me; it allows me to spend less time setting things up and more time creating. I try to keep my desk relatively empty: sewing machine and laptop are housed on top, while the pull-out keyboard tray is where I do most of my book work. When it’s creative time, books, pens, and pencils slide under the desk on the tray and my laptop moves wherever there’s an open spot for it in my room.

To create a level sewing surface, I have this portable sewing table that I keep in my closet until sewing time. The legs can be removed, but I leave them on all the time because, again, if I have a chance to sew, I want to be sewing not setting up.

portable sewing table

When sewing on such a high surface, it’s difficult to maintain good posture. I usually set one of my large textbooks on my chair to make me a bit taller (remember sitting on phonebooks at the dinner table?) and reduce wrist, back, and neck strain. It’s not like I have perfect posture in the first place… but I want to be able to sew ’til I’m 90.

The Ironing Board
If you’re working with interfacing, or articles of clothing that need hems, you’ll need an ironing station. When I worked at Jo-Ann fabrics, one of my colleagues told me, “you can iron on the floor, you’ve got a young back, but it won’t be young for long”. My dinky little dorm ironing board doesn’t have full-sized legs, so sometimes I’ll set it flat on my bed. Having a TV dinner tray around (make sure it’s relatively stable) is even better. Make sure you have a stable place to rest your iron, though… they don’t like falling on the ground.

dorm room bobbin storage

Storage
I like to keep my thread and bobbins out in plain sight because it’s a lot easier that way, and they’re colorful and pretty. My makeshift bobbin rack is just a 5″ square piece of cork (mounted to the wall using removable foam adhesive mounts) with pins spaced evenly across. I do it this way because I hate bobbin boxes (like this one) because I can never manage to get the lid off without shooting bobbins across the room. okay i’ve got two hours to sew before class, let’s just get out the bobbin…. pop! and there they go! all unwound and under my bed. No more of that.

My thread rack came from a big thread storage box I bought, and it had two of these smaller trays. The box is really nice, but I leave it at home with my embroidery threads and just keep one tray with me at school because it’s small and handy.

thread rack

I’ve got a small 3-drawer plastic chest that I keep my favorite fabrics in (the few that make the cut and get to come with me), and a rubbermaid bin on my closet shelf that holds my fleeces, since they’re larger. One drawer of my desk holds my scissors, tape measure, machine feet, and such. My cutting mat stands up next to the fridge, and my iron and ironing board live in the closet. That’s all I really need. Of course, it gets messy sometimes. And of course, I end up accumulating way more crafty things with each trip back home. But it works.

This is how I do it. Of course, if you’re trying to set up a sewing station in your room, you’ve got a good creative mind – I’m sure you can think of some great solutions to the small space issues! So my question for you: how do you deal with limited creative space? Are there any products or homemade items that you can’t live without?

Sewing Buttons to Knitted Garments Tutorial

stitching buttons to knit tutorial

I’ve got a tiny, simple tutorial for you today. I know the experienced seamstresses among you will say to yourselves, really? that’s tutorial-worthy?, and my reply is, sure. Because I’ve got a soft spot for you newbies out there.

I was walking around Target yesterday, buying up clearance boys’ flannel shirts to which I’ll add a few darts and wear proudly. The boys’ shirts always end up with the better plaids, somehow, plus they’re longer. And since I’m buying in kids, they’re cheaper (as in, less than $4 each). As Michael Scott would say, this is a win-win-win solution.

turquoise & orange striped gloves: beforeSuddenly I was hit with a revelation: what is it like to buy clothes when you can’t sew? How discouraged would I feel if I were forced to buy clothes exactly as they are, rather than buying them for what they could become? I can’t even imagine. I’m sure that I’d spend much more money on my clothes, and I wouldn’t be as happy, as me, wearing those clothes. So I’m planning a series of “before & after” tutorial/inspiration-based posts, meant to give a little push and instruction to those who might think “oh, but i’m not crafty”. Because modifying clothes, making them perfect for you, isn’t all that hard. And it is so very worth it.

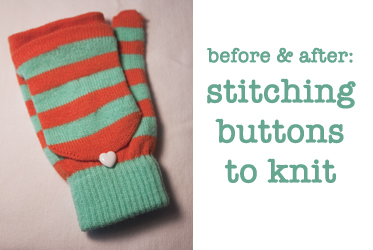
So here’s a simple tutorial: how to stitch buttons to knitted garments. I found these convertible gloves, turquoise and orange stripe!, in the dollar spot. My favorite colors, but they had a black button! Who decided that? A change of button quickly carried these gloves to their full potential, and I’m hoping you’ll apply this simple technique to your gloves and cardigans so that they are perfect for you.

stitching buttons to knit: step 1

First, pick out a rather large needle. We’re going to be stitching through the gaps in the knit, so there’s no sense fussing with a tiny needle for this project! Cut a decent length of thread (16 inches or so, more if your button has 4 holes), and thread your needle – but don’t tie any knots.

stitching buttons to knit: step 2

Pick out the spot where you want your button to go, and insert the needle between the knit loops of yarn. You may have to stretch the fabric a little bit to find your hole, but you generally don’t want to have your thread go through the yarn because that can decrease the structural integrity of the knitted object. Be sure to leave a tail on the other side, see?

stitching buttons to knit: step 3

Pass your needle through your button, then go back into the knitted garment a few loops away from where you were before. Make sure your tail is still there on the other side!

stitching buttons to knit: step 4

Now take your tail and your “active” length of thread and tie them in a reef knot or two. Make sure the first knot is tight… this ensures that your button will not wobble around.

stitching buttons to knit: step 5

See? A nice tight knot. Don’t cut your tail!

stitching buttons to knit: step 6

Now keep going up through that first hole, through your button, and down through that second hole until your button is sturdily attached.

stitch buttons to knit: step 7

After you’ve done enough passes, pull your thread through to the back side and tie it to the tail again with a few more reef knots. Now you can trim both your tails! And you’re done!

stitching buttons to knit: finished

See? So much better than that plain black button.

sewing in striped gloves

And now I can sew in style. ;)

Originally posted on February 13, 2011: before & after: how to sew buttons to knitted garments