Tagged: hassock-reupholstery

hassock re-upholstery complete!

hassock-upholstery complete

She’s all done! My hassock re-upholstery is complete, and I now have a brand new hassock!

hassock-upholstery complete

Here she is, looking quite pretty.

how to reupholster a vintage hassock

I’m very proud of this one. As I said at the beginning, this was a bit of a “scary project” for me, a stretch beyond what I’ve done before. But in the end, I didn’t have too much to worry about. It took some time, effort, and patience, but now it’s all done and I learned a lot of new tricks. I hope I’ve done a good job relaying those new tricks on to you!

For the final chapter of the hassock re-upholstery series, click through to read about how I refinished the legs!

(more…)

hassock re-upholstery part 3: stuffing, stapling, and tufted buttons of doom

hassock upholstery-1scrapfill

This is the fun part! I filled my hassock with anything and everything, as long as it was soft… and then I got to play with the staple gun!

hassock upholstery-2fleece

I started the filling process by laying down a large sheet of thin fleece interfacing. I wanted a “buffer layer” since my wool has some stretch tendencies and this thin layer of fleece helped guarantee that the outside wouldn’t turn out lumpy.

hassock upholstery-1fill-polyfil

I started by using polyfil to fill in the corners to make sure they’d be well-defined.

Next, I filled the cushion with fleece scraps, as you can see in the top picture. I picked this for multiple reasons.
1. I had a giant bag of the stuff, since I like to save it to stuff arthurs, and I had a ton of scraps from making all ten of my pink stars
2. It’s free and it’s soft
3. It was something I would have thrown away, so I was being un-wasteful
4. I wanted it to be something squishier/rounder than just a block of foam, since my foam fit-test was a very unexciting, flat cushion.
5. Most importantly… it’s dense enough that I knew it would keep its shape and last over time, unlike Poly-fil or foam that can sag with age if you aren’t really careful at the beginning!

So fleece scraps formed what would be the top layer of “squish” in my cushion.

hassock upholstery3-1fill-foamfrenchfries

Next came a huge amount of these foam french fries! These are from that super cool packing foam that is about 3″ thick but comes perforated, so you can tear apart what you need to protect your item during shipping. Even though it’s packing foam, it’s very high quality. I had a whole sheet of this perforated foam and I just tore each french fry away from its neighbor to make this mountain of squishy goodness.

Click on to see all the staple-gunning and tufted button adventures ahead!
(more…)

hassock re-upholstery, part 2: making the cushion

After demolition of the original hassock upholstery, I was ready to begin designing and sewing the brand new cushion.

hassock upholstery-pattern

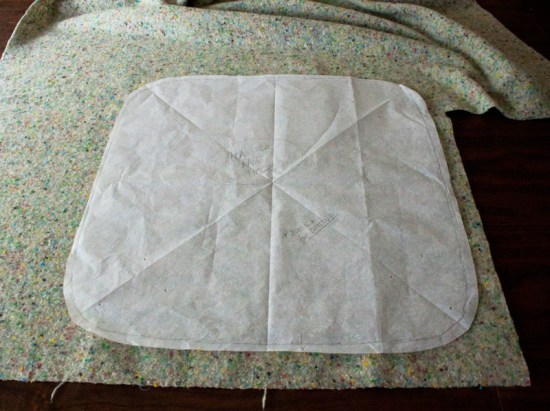
During demolition, I traced the outline of the current cushion to get a good start on the pattern. I cut my tracing out loosely, then folded a few times (think paper snowflake) as you can see by the creases in the tissue. When I cut the shape with everything folded, I could be certain that it was symmetric in all directions. Rounded corners are especially easy for me to skew one way or the other when I do it by sight, so folding made that much easier.

hassock upholstery-fabriccloseup

Here’s a closeup of the fabric I used! It’s heavy duty wool with a woven side and a softer, fuzzy side. Even though the fuzzy side is obviously the right side, the wrong side is also interesting.

hassock upholstery cushion-cutout

I cut out my rounded square top, and two long rectangles to serve as the sides of the cushion. This could have been one super long rectangle, of course, but that wouldn’t fit with my fabric allowance. Plus, this makes it symmetric.

More cushion construction after the jump… including my classy little “underflaps” invention!
(more…)